Just Kitting Studio Items for Sale

Saturday, April 30, 2011

I love my E2 and CC challenge Gift Card holder


Today I finally got to spend the day with my new E2.  I love love love this machine.  I watched the video on Cricut.com  http://www.cricut.com/expression2/celebration.aspx.  I highly suggest you watch this as a great overview in an orderly manner.  I think it is very easy to use.  My only issue is not being able to move cuts around the mat like we can with our Gypsy.  The cuts are very close to each other on the mat which makes it hard to cut  different  color paper  for different cuts.  I am using the space bracket and line return to help with this.   Hoping they will update this. 
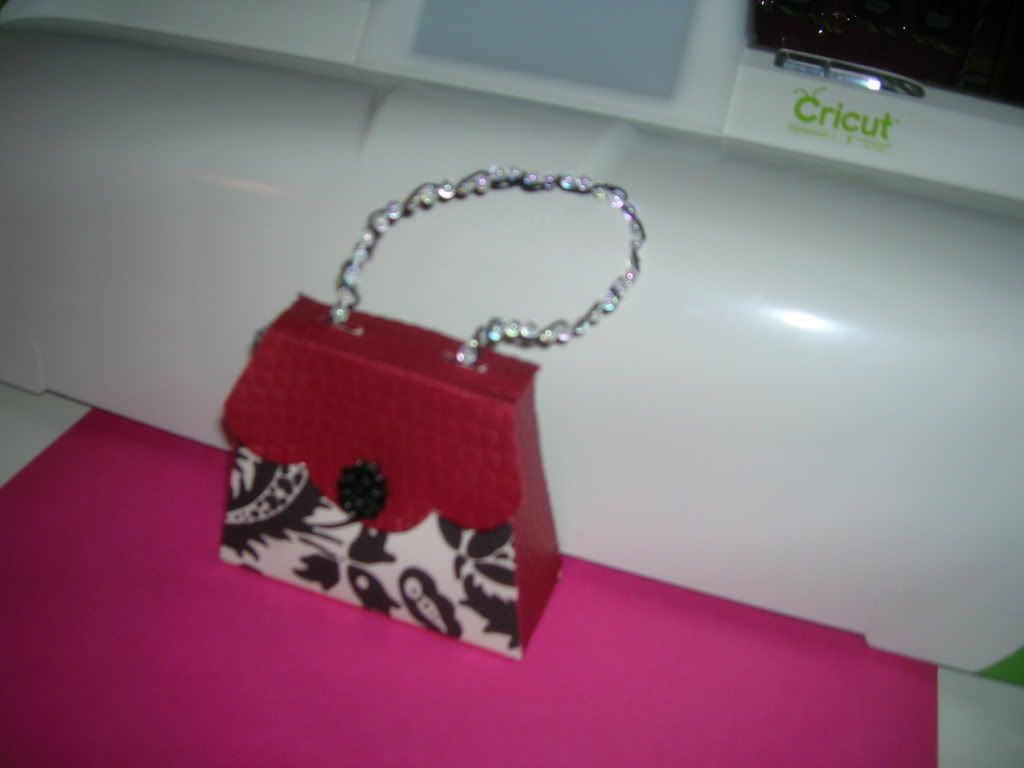
The challenge this week for the CC challenge is to make a gift card holder.  Since tomorrow is my DD's birthdy  I made this little purse.  I cut the little purse at 7 inches ( largest that would fit on 12 x 12) from Tags, Bags, and More two times, once in red cardstock and once in black and white double sided paper.  I then cut the red pieces so that the front flap, sides and bottom were all that was left.  I used my Cuttlebug, embossing it to look like leather.  I added a cute black rose button for closure and used beads with miracle thread wrapped around to make handle.  

Wednesday, April 27, 2011

My E2 is on the truck for delivery today

I can't believe it!  I got my shipping notice from HSN and my E2 is being delivered today! I was just checking to see where it was shipping from and it is was sent from Ontario, Calif and I live just above LA so it is already on the truck to be delivered.  So excited. !  I will post more later.  


Tuesday, April 26, 2011

BBTB2 and Craft Spot Challenge- Layout of youngest granddaughter

This week the BBTB2 challenge is to use one of the crowns from Home Decor.  The Craft Spot Challenge was to make something to welcome a new Bundle of  Joy.  This is the layout I did today welcoming my youngest granddaughter Kenzie  who we think is a sweet princess.  I cut out the Once Upon a Time and the A Dream Come True from Storybook.  The crown is from Home Decor and the wand and castle is from Once Upon a Princess.  I cut the castle in 1/2.  I used MS butterfly punch and PATP punch for sides and mats. I used glitter paper, shiny cardstock, and lots of pearls to decorate.  


Close ups of pages (Remember you can click on picture to make it larger also.)

Finished my Christmas layouts of grand daughters first Christmas

I decided to finish my Christmas layouts of grand daughters yesterday and today.  This was both girls first Christmas so very special to us.  The top two layouts I used Jolly Holidays which I think has such cute little  Christmas characters.  The third double layout I used a MS punch and the snowflake center that came out when I punched to decorate the pages.  

Monday, April 25, 2011

Three double page layouts of grand daughters

Over the weekend I organized the mounting stack of pictures of two granddaughters.  Since today was my last day off before I start babysitting youngest granddaughter I put my scrappin into high gear.  I realized I need to quit agonizing over each page and get going before grand daughter number three arrives in July.  
The first layouts all the cuts were done using Heritage and I used a MS punch.     
The second layout the title and two birds in the nest came from Sweethearts,  I added another little bird to represent the new baby.  I also used MS PATP leaf stamp and the branch stamp.  
The last layout for tonight was done with some gorgeous shamrock paper I got at local LSS.  
No Cricut on this one.  Quick and simple.  

Sunday, April 24, 2011

Wishing you a Happy Easter with my two precious grand daughters

Wishing you a very Happy Easter with many blessings to you and your family.  
This is Mackenzie who is 5 months old. She is ready to go to church in her bunny ears and First Easter bib.

This is Katie who is 15 months old holding her bunny from grammy and papa.  

Thursday, April 21, 2011

Five baby layouts of my granddaughter

Trying to get going on grand daughter #2's album.  These are 4 pages I did yesterday.  The top of the first two layouts is a 3 inch strip double punched with a new MS punch.  I then found the scrolly hearts that matched as part of a design on Damask Decor.  The crowns are from OUAP and spell out Mackenzie.  
For the second pair of layouts I used this really cute Sweet Pea paper I got at Joanns.  I added the words and little baby in the  pea from New Arrival.  Mackenzies name was from her shower diaper cake.  
This page I was hunting for the words Ready, set, go but instead I found Ready set grow from Wall Decor and I liked that idea since they were leaving the hospital and babies grow so fast.  I added flower MS punches for frames and flowers.  

Tuesday, April 19, 2011

So excited my Easter projects made the Chirp

So excited that two of my Easter projects were mentioned in the Cricut Chirp today.  They were the Easter egg tree and the Easter banner  I made for the Easter bloghop  I participated in this month.   You can find more pictures on April 8th and 9th.  Feels so good to have your projects noticed out of all the amazing thing posted on the Message Board.  


Monday, April 18, 2011

Pineapple card for BBTB2 challenge this week

The challenge this week at BBTB2 is to make a project with a pineapple.  It is amazing to see the beautiful cards the Design Team made with pineapples.  The card I made I designed from Life's a Beach on my Gypsy welding it together.   Thought this would make a cute party invitation.   I cut the entire thing out of orange cardstock and then cut the tree so it fit on back piece inside.  I placed the pineapple cut where the diamond design was.  The umbrella, cherry, straw and lemon are cut from scraps and I used Stickles on  it.  The word party is also from Life's a Beach.  


Sunday, April 17, 2011

CC Weekly Challenge card- Prima like flowers

This is my entry for the Cricut Circle challenge this week to do something with a flower.  I love making these flowers and they are much cheaper than buying Prima flowers.   I cut scalloped circles from Mother's Day Bouquet cart at 2 inches, 1 1/2 inches and 1 inch.  The next step is the most important.  YOU HAVE TO  WET THEM!!!!!!   I used to try to skip this step and they just come out so much better if you wet the paper.   So once I cut a bunch of scalloped circles out  lay them all out I spray them with a mister.  When they are good and wet I wad them up into little balls.  I let them dry for a few minutes and then carefully open and spread out not flattening them completely.  Let dry a little longer but not completely.  I like to work with them when they are still pliable.  Next  I stack 5 to 8 high.  Punch hole with crop a dile and add  brad to center.  I then pull each layer up towards the brad  being careful not to tear.  then I pull them down forming the flower.  After they are formed the way I want, I let them dry and then add Tim Holtz ink, Stickles and/or  spray with Glimmer Mist depending on the look I want.
The paper for the card was a double sided piece and the flowers were actually made from the same piece.  I have  3 other flowers from this one piece of 12 x 12 paper.  For this card  I added ribbon and used a MS punch on the edges.  I also added a birthday stamp.

Nemo birthday card

This is the card I made for my son in law who helps me with my blog.  He has an amazing salt water tank and runs a website for people with aquariums.  I used the Best of Pixar cart and some water look  paper from Joanns  I had leftover from another project.  

Friday, April 15, 2011

Baby shower cards using 3 Birds

This is a baby card for DD to take to work for a shower.  I used 3 Birds but made a combo of several birds.  Little Angel is also from 3 Birds and I added feathers to the wings.  DD said everyone loved the card.  

Thursday, April 14, 2011

BBTB2 challenge- Use an egg from Easter 2010 cart

I made this card today for the BBTB2 challenge to use the egg from the Easter 2010 cart or another cart.  I used the Easter 2010 egg and scalloped egg.  I used my Gypsy to weld the front and back together and to make a window in the front.  I used double sided pastel paper.  I then cut out flowers from Mother's Day Bouquet for the top, Happy Easter which is glued to inside but shows through to front, and one of the cute scenes from Katie's ABC.  Edges are chalked and added ribbon and pearls.  

CC Weekly Challenge- What Bugs You

This is my project for the Cricut Circle Challenge this week to make a layout of something that bugs you. The other requirement was to have a bug on the page.  I used the Paisley cart for the zebra in the car and the small cell phone.  The cricut head is from Everyday Cricut and I turned the smile upside down and added red eyes to show anger.  The large cell phone and no sign is from Going Places and the letters are from the Mickey Font.  

Wednesday, April 13, 2011

All white cards

I have always loved all white cards when I have seen them on the MB and blogs.  So I finally decided to try one for a sympathy card for my friend.  I used the Brocade Window Cuttlebug folder, a flower cCuttlebug folder and the cross from Easter 2010.  The paper is from a 8 1/2 x 11 shiny cardstock I get at J's.  I punched corners with MS punch and added pearls.  
After I made the sympathy card I decided to make my three Christmas cards for this month the same way. ( I am trying to make cards each month so I will have them for next year.) I used snowflake Cuttlebug folders, MS snowflake punch and Merry Christmas embossing folder and again pearls.  Sorry the pictures are so bad but I love this look.  

Easter baskets from Easter 2010 Cart

I made 12 of these little baskets for my MOPS (Mothers of Preschoolers) group at church and a few friends.  
The basket, bunny and grass are from Easter 2010 cart.   I didn't have enough Easter paper so used some pastel double sided paper which was nice and heavy.  Using double sided papers make the inside and handles look much better.  After cutting them out I realized there was enough scraps to cut bunnies for each one.  I added little flowers to bow, fuzzy ball tails and googly eyes.  These were quick to do since the pastel paper pack all went well together.  I have to go get more candy though as I hate the Peanut Butter M and M's.  

Tuesday, April 12, 2011

Cricut Circle April Reuse, Recycle, Repurpose challenge

This is my entry for the Cricut Circle Challenge: Create a project of your choice and reuse, recycle or repurpose 3 items on your creation. Project must include atleast 2 different 
Cricut Image Cuts. 

Picture 1- is my finished project.  

Picture 2- These are the items I chose to recycle- a Tim Holtz chipboard box, dryer sheets, old beads, a coaster from a restaurant and a coffee cover from a bagel place.  
Picture 2- I used 2 different cuts from Elegant Edges page 64 and 68 and also the shadow of the oblong one.  I then glued the Elegant edge circle to the coaster.  
Picture 3- I cut the dryer sheets in one inch strips and gathered around a cardstock circle ( 2 1/2  Inch) gluing as I went. It took 2 strips to make first layer.  I made another layer and gathered a little tighter to make a medium layer and then made a small layer on a one inch circle.  
Picture 4- Lay layers out on paper towel and spray with Glimmer Mist. Pat excess off with paper towel and let dry.    
Picture 5- Glimmer Mist lace, pat off excess and let it dry and then glue all layers together. 
Picture 6 - Inside of box.  This where I am going to keep all the butterflies, tiny flowers, dragonflies and such that I cut from tiny scraps to keep for projects.  So not only did I recycle to make the project but am keeping little punches in it that are recycled from tiny scraps.  

Monday, April 11, 2011

Vintage Shadowbox and Card for 100 year old Great Aunt


This weekend we celebrated my great aunt Ora's 100th birthday.  We weren't supposed to bring gifts but I wanted to make something for her showcasing her 100 years as a surprise.  My uncle sent me some pics he had of her as a young child and young woman and I used Bo Bunny paper.  I  used Storybook font and aged with Glimmer Mist and Tim Holtz ink.  I also made a card to match.  She was thrilled and the shadowbox was placed on the table where everyone signed in so that people could see the pictures of her.

Shadow box
Card front
Card inside

One very happy "100 year" old great aunt

It's Easter Blog Hop Blog Candy Winner

First of all let me thank all of you for your lovely comments and for participating in the It's Easter Blog Hop.  There were so many great Easter creations to inspire us all.  The winner of the Blog Candy for my blog is #56  Lisa R. who posted on Day 2-Love the tree idea! Great easter card!  Thanks for sharing.  Lisa please let me know if you wish a $10 gift certificate to Michael's or to Joann's and your mailing address at swoozan@roadrunner.com. Also big thanks to the lovely Shawnee for setting up this wonderful blog hop.  You did an awesome job Shawnee! 


Hope you will all come back to join me again.  Happy craftin and Happy Easter.  

Sunday, April 10, 2011

It's Easter Blog Hop Day 4- April 10

Day 4  Hard to believe it is Day 4 and the last day of the It's Easter Blog Hop. I hope you have had  great time joining us and have a load of ideas to celebrate Easter.  I know I sure do.  Today I am celebrating my great aunt's 100 birthday with my family.  Please come back tomorrow to see who one the Blog Candy and I will share a picture of the shadowbox and matching card I made my great aunt.   Of course we aren't supposed to bring presents but I had to make her something and I know she will love it.  
So let me remind you one more time that for each day you can leave a comment and get 4 chances to win. If you miss a day you can still go back and leave a comment.  I will choose the winner by random.org on Monday morning. Sorry I forgot to post my Blog Candy last night. The  winner of my blog will receive a $10 gift card to either  Michaels or Joanns  (your choice).   All the Blog Hop details and the participants are in my post for April 7th if you need more information. 


Vintage album page- For this double page layout I used A Child's Year and Mother's Day Bouquet.  I started with a vintage look paper that I got at LSS.  I also used some Anna Griffin white lace border pieces I had left from Valentines, doilies of various sizes, flowers, ribbon, lace,  butterflies and other embellishments.  I used a lot of Glimmer Mist to antique the doilies and all the other page elements.  Every since I took a Glimmer Mist class at my LSS I have been using it like crazy.  


Folded Frame Card- This is a card technique I found on Splitcoast Stampers website. I love this site to learn new techniques and various card folds.  Bunny is from Easter 2010 cart. The egg paper is from J's and is flocked.  The check is the backside.   Ribbon is from Michaels.   Here is the link:
http://www.splitcoaststampers.com/resources/tutorials/foldedframe/
Thank you again for joining me the last 4 days and I hope you will check out my Blog again.  Happy crafting.
Your next  crafty idea comes from the talented  Patricia at http://creativediva98.blogspot.com/

Saturday, April 9, 2011

It's Easter Blog Hop Day 3- April 9

Day 3
Thank you so much for all of you who joined in the Easter Blog Hop the last two days and left such wonderful comments.  I really appreciate your comments.   Remember for each day you can leave a comment and get 4 chances to win. If you miss a day you can still go back and leave a comment.  I will choose the winner by random.org on Monday morning. Sorry I forgot to post my Blog Candy last night. The  winner of my blog will receive a $10 gift card to either  Michaels or Joanns  (your choice).   All the Blog Hop details and the participants are in my post for April 7th if you need more information. 


Easter Banner - This project was made to use some of the Vintage Easter cards I bought in a pack at my local LSS.  I decided to make a banner so everyone could enjoy the cute little pictures. I started with precut out egg shape I found in Children's sections at Michaels and traced papers and cut to fit.    Each egg was cut and decorated with ribbon, lace, trim, and vintage Easter cards.  The  Easter letters  were cut  from Storybook.  I wanted to decorate the Easter eggs with lacy look edges.  I used several different MS punches and cut 2- 12 inch borders for each egg.  I then cut into borders 1/2 or so towards border so I could curve straight edges around egg and glue down.  (See picture of back) Next I glued ribbon across backs of eggs and then covered each egg with another cutout paper egg.  This is the banner hung in my kitchen.
Closeups of eggs and borders
 This is the back so you can see how to curve it around shape.  

SU Stamp card- I posted this last week in my blog but I wanted to share it again.  A friend of mine Brenda made a card with this and I fell in love with it.  Brenda set me up with her SU rep and this is what I came up with.  This is the card I am giving my two daughters for Easter.  I used the wrong kind of dark blue ink so when I put the Diamond (white) Stickles on it began to run.  I thought I had ruined it and would have to start over but then I realized I really liked the way it looked so continued.  

Tomorrow I will be posting an  Easter Vintage layout and my last card.  Have a great weekend.   
Your next  crafty idea comes from the talented  Patricia at http://creativediva98.blogspot.com/